Promotions & Upcoming Events

June 1, 2012
Release of new annual catalog
Showing posts with label christmas. Show all posts

Sunday, December 25, 2011

Merry Christmas

I hope everyone is having a wonderful time celebrating this holiday with their friends and family. I just had to share another Christmas card that I created for this joyous holiday!


This is a really simply card, but festive nonetheless. I love the ornament punch! It is great focal point for this card. After running my piece of Confetti White CS through the Big Shot in the Snow Flurry embossing folder (from 2012 Holiday Mini), I punched out an ornament and placed a piece of Letters to Santa DSP behind the negative space. It was a quick and easy card to make! Enjoy!

Card Recipe:
Paper: Confetti White CS, Poppy Parade CS, Letters to Santa DSP
Ink: Cherry Cobbler
Stamps: Four the Holidays
Accessories: Poppy Parade Stiched Ribbon
Tools: Big Shot, Snow Flurry Embossing Folder, Ornament Punch


Friday, December 23, 2011

Oh Glimmer Brads...How I adore thee


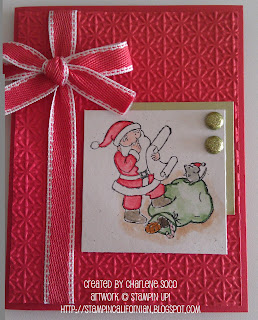
Just one more day before Christmas Eve, and I am certainly filled with the a creative holiday spirit. Even though I have sent out all the planned Christmas cards, I still couldn't help but make a few more...just because! This card features the Forrest Festivities Stamp Set from the 2011 Holiday Mini Catalag.


I absolutely adore Stampin Up's glimmer brads! These darling little things add just the right amount of sparkle to any project!

Card Recipe:
Paper: Poppy Parade, Confetti White, Certainly Celery
Stamps: Forrest Festivities
Ink: Stazon, Poppy Parade, Garden Green, Many Marvelous Markers
Accessories: Glimmer Brads (subtles collection); Poppy Parade 1/2" stiched polly ribbon
Tools: Big Shot, Snowburst embossing folder; Aquapainter

Hope you enjoy this card as much as I enjoyed making it!
Happy Stamping!

Thursday, December 22, 2011

A twist on my Happy Holidays Button Buddies Card with Got Treats stamp set

I hope you all liked the Happy Holidays Button Buddies card I posted recently as much as I enjoyed creating it! I liked the design of that card so much that I had to make another one. This time however I simple used the "Got Merry?" gingerbread man from my Got Treats stamp set as the focal image instead of the Button Buddies snowman.


Another reason why I really liked this card design is because it gave me a good way to use the scraps of DSP I have accumulated. I took 3 scrap pieces of Letters to Santa DSP and cut them into strips of different lengths. With my 1 1/4" square punch, I cut the "dovetail" on the end of each to create some banners.


I embellished the little gingerbread with Stampin Up's 3/16" brads (brights collection).


Hope you all like it!

Click here to order your supplies online today!

More Christmas Treats with SU Cello Bags and Kraft boxes


As gifts to my co-workers this year, I went ahead and baked (again) some of my chocolate chocolate chip cookies. It took every ounce of will power I had not to "sample" any as I took them out of the oven! I boxed them in Stampin Up's Kraft Gift Boxes (#124106), and Stampin Up's large cello bags.


The Kraft gift boxes are the perfect size for cookies! I decorated the sides and top of the boxes with pieces of Letters to Santa DSP, and created a window using the Decorative Label Punch and window sheets. For some embellishment, I created little poinsettias (which I must say I am very proud of) using the 5-petal flower punch, boho blossoms punch, and neutrals glimmer brads.


Here is a better photo of the little poinsettias. Using Poppy Parade cardstock, I punched two flowers with the 5-petal flower punch. To add some texture, I used the small end of my embossing tool and "drew" lines on the flower. Quick tip - I did this on the soft mat that comes with Stampin Up's mat pack. I found this really helps soften the paper to make it look like a real flower! I also punched a small flower from the boho blossoms punch and used the same softening technique. I layered the 3 pieces together and embellished the center with my neutrals glimmer brads. I am really really happy with how they turned out!


I also packaged some of the cookies in cello bags. Stampin Ups' cello bags come in 3 sizes - large (6"x8"), medium (4"x6"), and small (3"x5"), and provide a quick and simply way to doll up homemade treats! I used the large cello bags here. I embellished one bag with Marina Mist satin ribbon, and the other with Old Olive ribbon (from the Elementary Ribbon Originals set found in my online store clearance rack).


For some added "umph," I used Stampin Up's My Digital Studio (MDS) program to create tags for them. The tag seen here was part of the Home for the Holidays download (which I think I had downloaded for free). The tags were part of template, so they were SUPER easy to print out. They were punched out perfectly with the 1 1/4" circle punch. Easy breezy tag!

I hope you like what you see here! I would really appreciate your comments and feedback! Thank you and Happy Stamping!

Wednesday, December 21, 2011

Happy Holidays with Button Buddies

One of the newer stamp sets from the current 2011-2012 IB&C that I treated myself to this year was the Button Buddies stamp set. This set is absolutely adorable - not only because the images themselves are cute, but also because this stamp set can be perfectly coordinated with Stampin Up's designer buttons. Check out the christmas card I made for this year to see what I'm talking about!


Card Recipe
Paper: Old Olive, Early Espresso, Confetti White, Letters to Santa DSP
Stamps: Four the Holidays, Button Buddies
Ink: Cherry Cobbler, Early Expresso
Accesorries & Tools: Old Olive 1/4" grossgrain ribbon; Neutrals Designer Buttons; Boho Blossoms Punch; Big Shot; Perfect Polka Dots Embossing Folder; Rhinestones


The "Happy Holidays" sentiment was stamped in Cherry Cobbler Classic Ink on Confetti White CS, and layered over a piece of Early Espresso CS. I added some flowers punched with the Boho Blossoms punch and accented with rhinestones,


Here is a close up of the main image with the snowman from the Button Buddies stamp set. His belly was accented with a white marbled button from the neutrals designer buttons pack. I think he is sooooo cute!!!


Click here to visit my online store today!!!

Stay up-to-date with my classes, projects and events! Subscribe to my blog! You're support is greatly appreciated! Happy Stampin!

Another Occasions Mini Sneak Peak - Pleated Satin Ribbon & Rue Des Fleurs stamp set


Christmas is only a feew days away now, and here I am continuing to crank out my Christmas cards like a mad woman. Unfortunately, I did a very poor job of planning this year. But I am taking this opportunity to showcase more new items that can be found in the soon-to-be relased 2012 Occasions Mini (available Jan. 4 2012).


This card features the new Rue Des Fleurs stamp set, as well as the 3/8" pleated satin ribbon in Baja Breeze.

I created the background using the Vintage Vogue jumbo stamping wheel. To add some "flavor" to the background, I used my aquapainter to add some color to different parts of the image.


I haven't used my Stampin Pastels in a very long time, and decided it was about time to resurrect that technique =) Using the trumpet image from the Rue Des Fleurs stamp set, I inked with Versamark and stamped onto white cs. Then using the applicators that come with the Stampin Pastels, I dabbed various colors over the image. The colors I used were Close to Cocoa (retired), More Mustard, and Summer Sun (retired). The "merry christmas" sentiment is from the Easy Events stamp set. To add a little more dimension to it all, I took my spritzer tool and marina mist marker for an added touch of color.


Card Recipe:
Paper: Confetti White; Soft Suede
Ink: Soft Suede, Marina Mist, Versamark
Accessories: Baja Breeze 3/8" pleated satin ribbon
Stamp Sets: Rue Des Fleurs, Easy Events, Many Merry Messages (inside sentiment)
Tools: Decorative Label Punch, Color Spritzer Tool; AquaPainter; Stampin Pastels


Click here to order your supplies today!

Tuesday, December 20, 2011

Paper Doily Large Sizzlit Die from 2012 Occasions Mini

So here is a sneak peak of one of the new products that will be found in the upcoming 2012 Occasions Mini Catalog - the Paper Doily Large Sizzlit Die!! Here is a card I made featuring this lovely new tool!


I cut the large Paper Doily in Certainly Celery CS. To add more color and depth, I cut a scallop circle from the Perfect Pennats Die in Bashful Blue and ran it through my Big Shot in the Perfect Polka Dots embossing folder. Then I layered it over the center of  the large Paper Doily. The large Paper Doily makes a great background and quickly embellishes the card. This is a die I plan on using often!

Card Recipe:
Paper: Poppy Parade CS, Certainly Celery CS, Bsahful Blue CS; Letters to Santa DSP
Stamps: Many Merry Messages; Pines & Poinsettias; Northern Hearts (retired - inside card)
Ink: Early Espresso, Crumb Cake
Tools: Big Shot, Paper Doily large sizzlit die, Perfect Pennants Die, Perfect Polka Dots embossing folder, 
1 1/4" square punch


Saturday, December 17, 2011


I really enjoy the how Stampin Up's Jumbo Wheels make it quick and easy to create a beautiful background for my cards. To make sure I am stamping in a straight line, I always use my Stampin' Around Wheel Guide (#104834)

Card Recipe
Paper - Confetti White CS, Old Olive CS, Real Red CS
Stamps - Very Vintage Jumbo Wheel
Ink - Chocolate Chip classic ink
Tools - Stampin Around Wheel Guide, 1 1/4" circle punch, Sticky Sheet
Accessories - Holly Berry Bouquet Designer Fabric; Chocolate Chip polka dot scallop edge ribbon


The fabric flower rossette was made using the Holly Berry Bouquet designer fabric from the 2011 Holiday Mini. To create the rossette, I first used my 1 1/4" circle punch to cut a circle out of my sticky sheet. I find this makes the best base for the rosette. I tore a strip of my designer fabric, and tied a knot in one end.
I stuck the knotted end onto the center of the sticky sheet circle (after peeling off one side of the sticky sheet to reveal the adhesive). Then I twisted the fabric and wrapped it in a circle around the center to form the rossette. To create the leaves, I just cut it out from some scraps of old olive cardstock.

Click here to order your supplies!

Friday, December 16, 2011

Snowflake Sugar Cookies


I can't help but feel truly inspired when the holidays come around. I love making holiday cards, and delicious holiday treats for my friends. I made these sugar cookies for some girlfriends of mine using my Holiday Sweet Press Cookie Stamps (#125152).  It was a quick and easy project that (I think) turned out beautifully. I used a pre-mixed sugar cookie dough recipe, stamped the snowflake image into the dough, sprinkled some blue sugar crystals on top, and popped them into the oven to bake.


One tip when using these cookie stamps - I dipped the "stamp" in some powdered sugar before staping into the cookie dough. This helps prevent the cookie dough from sticking onto the stamp.

After I finished baking the cookies, I packaged them in Stampin Up's large cellophane bags (measuring 6" x 8" #102210). I  tied the bags with 1 1/4" stripped grossgrain ribbon in cherry cobbler. 


I created a tag for the cookie bags using the Forest Festivities Stamp set from the
2011 Holiday Mini Catalog.


Order your supplies today! Click here to visit my online store.

Wednesday, December 14, 2011

Everyday Elegance Christmas Card


Christmas is really my favorite time of the year! I can't help but smile when I hear Christmas songs playing, and I ALWAYS love creating cards for the holidays! These cards were created using the Everyday Elegance Simply Sent Card Kit, Candy Cane Rub-ons from the clearance rack on my onine store, some glitter, and various punches.


For this card, I used the Christmas Tree rub on and punched it out with my 1 3/4" circle punch. For the glittered scallop circle, I punched out a piece of cardstock with the 2 3/8 scallop circle punch. I stamped my Versamark pad over it, covered it with heat & stick powder, and "activated" it with my heat tool. Then I covered it up with my gold Stampin Up glitter, and re-heated the paper with my heat tool to make sure it sets properly. Viola! I turned an ordinary piece of paper in to a glitter-tastic embellishment!

Card Recipe:
Everday Elegance Simply Sent Card Kit; Candy Cane Rub Ons; Forrest Festivities Stamp Set; 2 3/8" scallop circle punch,
1 3/4" circle punch; decorative label punch; Real Red classic ink pad; heat & stick powder; gold glitter


For this card, I again used an image from the Candy Cane Rub-ons and then punched it out with my 2 3/8" scallop circle punch. I punched out a second scallop circle from Baja Breeze cardstock, and offset the Baja Breeze scallop circle behind my whisper white scallop circle with the image. To add some bling, I decorated the endge of the scallop circle with some rhinestones.

Friday, December 9, 2011

5-Petal Flower Punch Christmas Card


Card Recipe:

Early Espresso CS; Old Olive CS, Pretty in Pink CS; Letters to Santa DSP; 5-Petal Flower Punch;
1/2" stiched-poly ribbon in Blushing Bride; Teeny Tiny Wishes Stamp Set; Subltes Desginer Buttons; Hemp Twine; early Espresso Classic Ink

fun with Fun Flowers die


I have definitely been out of the loop lately when it comes to updating my blog. It's not that I haven't been stamping, but I just haven't gotten around to uploading photos as regularly as I should. Plus, I caught a cold right before Thanksgiving and now it has totally gotten worse! I won't gross everyone out with the icky details.  So I thought finally posting some items I created recently would help take my mind off of being sick.

Card Recipe:
Early Espresso CS; Whisper White CS; Real Red CS; Letters to Santa DSP; Teeny Tiny Wishes Stamp Set; Dotted Scallop Ribbon Border Punch; Fun Flowers Die; Perfect Pola Dots Embossing Folder; Snow Burst Embossing Folder; Big Shot; Antique Brads


I cut the flowers with my Fun Flowers Die (#121812), then embossed then with my Perfect Polka Dots and Snow Burst embossing folders. I sponged the edged with early espresso classic ink to add more texture. I crumpled them up a bit to add more dimension and embellised them with my antique brads


I love the versatility of the Fun Flowers die. Not only can you use it to create flowers to decorate cards, but you can also use it to create other fun projects like the one I posted here.

 
Click here to visit my online store, and order your supplies today.

Thursday, December 8, 2011

CANCELLED - December holiday tag and card class

Due to lack of responses, this class has been CANCELLED.
Please note - if you are interested in a particular class but are unable to attend, I would be happy to host a personal class for you and your friends at date and time that works for you. Don't hesitate to give me a call. =) Happy Stamping!


Saturday Dec. 10, 2011 - 1:00pm to 4:00pm - Holiday tag and card class
Come to my holiday tags and cards class where you will make 10 holiday tags (2 each of 5 designs seen above) perfect for dressing up your holiday gifts this year. Each tag will measure about 3x3 inches in size. In addition to the 10 holiday gift tags, you will also be making 2 holiday greeting cards.

Class fee is $15. All materials will be provided except adhesive. Please bring your own SNAIL adhesive.

RSVP deadline - Wed. Dec. 7
**Class subject to cancellation if less than 2 people sign up***

Wednesday, November 23, 2011

Silver Snowflake - Holiday gift tags


Add a personal touch to your christmas gifts this year by adding handmade gift tags
made with Stampin Up! products!

Supplies Used:
Crumb Cake CS, Night of Navy CS, Teeny Tiny Wishes Stamp Set; Northern Hearts stamp set (retired); White Craft imk pad; Embossing buddy; Versamark Ink;
Silver embossing powder; heating tool, rounded corner punch.

Take a 3x6" piece of crumb cake cs and fold in half to create the base of the tag. Take a 2-3/4 x 2-3/4" piece of Night of Navy Cs and rub the embossing buddy across it a few times (the embossing buddy is a great tool to make sure the embossing powder only sticks to the stamped image so you don't speck of embossing powder everywhere). I inked my snowflake image with my versamark pad and stamped on the Night of Navy CS. Then i poured some silver embossing powerder over the image, tapped off the excess, and embossed the image with my heating tool. Under the image, i stamped the "merry christmas" sentiment with white craft ink to make it stand out across the dark colored paper. I rounded the corners with the round corner punch and Ta Da! Beautiful silvery snowflake cards to decorate your holiday gifts!!!!


Visit me Stampin Up Online Store to order your Stampin Up products today!!!

Click here to check me out on Etsy

Holly Berry - handmade christmas tags


Create these quick and easy christmas gift tags with products from Stampin Up! 

Supplies Used:
Bashful Blue CS, Cherry Cobbler CS, Confetti Chite CS, Easy Events stamp Set,
Crystal Effects, Many Marvelous Markers (old olive, rose red)

The base of the tag is made with Bashful Blue cardstock cut to 3x6 inches (folded in half to create a 3x3 inch card). Each additional layer was trimmed by a 1/4 inch - cherry cobbler cs 2-3/4 x 2-3/4"; confetti white cs 2-1/2 x 2-1/2".  I colored the stamp using my basic black marker for the holly berry and my rose red marker for the "merry christmas" sentiment. After stamping onto the confetti white cs, I colored in the holly berry image with my old olive and rose red markers, then applied some crystal effects over the image to add some depth and texture.

Visit my Stampin Up online store to order your supplies today! Don't forget to check out the Online Extravaganza too!!!

Click here check me out on Etsy

Saturday, November 12, 2011

My Very Own Winter Wonderland


The holidays will soon be approaching, and what a better way to get into the holiday spirit than to start pulling out the the holiday decorations - on in my case....creating my own! With a little bit of imagination, I created these holiday trees to decorate my crafting space for the holiday season. I also used these trees as part of my display at the Life & Style event my friend organized tonight (more photos from the event to come).  I had a lot of compliments about these trees =) I made me very happy!


To create these beautiful holiday pieces, I used the following Stampin Up supplies: Big Shot, Fun Flowers Bigz Die, 2 3/8" scallop circle punch, 1 3/4" scallop circle punch, Perfect Polka Dots embossing folder, Snow Burst embossing folder, Beautiful Butterfly Bigz Die, Multipurpose Liquid Glue, Whisper White Cardstock, Silver Glimmer Paper.


Additional supplies: white styrofoam cones of varying sizes, hot glue gun, straight pins (I used flower pins with the pearl tips so I could just stick it through my finished flower and into the Styrofoam cone).


I accented my trees with butterflies cut from the Beautiful Butterflies Bigz Die.  They too we adhered to the Styrofoam cones with the pearl tipped straight pins.


I created a base for the largest of my three holiday trees. The base is actually an empty yogurt container that I washed out. Using SU's Holly Berry Bouquet Designer Fabric and my hot glue gun, I adhered the fabric around the empty container. To clean up the edges, I used 1 1/4 striped Grossgrain Ribbon in Cherry Cobbler that first folded in half and adhered together with my hot glue gun. The "Peace on Earth" sentiment is from the Four the Holidays stamp set.


Saturday, October 22, 2011

Got Treats Stamp + Glitter = Awesomeness!!!

For my most recent stamp class, we created this Holiday Card using the Got Treats Stamp Set. I had originally purchased this stamp set to use with the Stampin Up Milk Carton Die, but wanted to see what other ways I could use this stamp set. So with some heat & stick powder, my heat gun, and some glitter...I came up with an awesome way to add some more sparkle to the upcoming holiday season!


Stamps: Got Treats; Four the Holidays
Paper: Early Espresso CS; Confetti White CS; Marina Mist CS; Letters to Santa DSP
Ink: Cherry Cobbler
Accessories: Marina Mist Satin Ribbon; Antique Brads; Versamark; Heat & stick powder; heating tool; glitter


I love glitter, and the heat & stick powder is a great way to adhere the glitter to your projects! Basically, you (1) stamp your image using a VersaMark pad (or marker), (2) sprinkle heat & stick powder over the entire image; (3) tap off the excess powder; (4) heat it up with heating tool until the powder is melted; (5) while it is still warm, sprinkle glitter over the image and tap off the excess glitter...Ta-Daaa!


I had originally stamped the little gingerbread man just using soft suede ink, but thought it looked a little...umm...blah...i guess you could say. Then I tried it with the glitter...and i looove it so much more now =)


And now for the bow...I created the little dove-tail accent by folding the end in half and then just snipping off a piece at an angle. Then I wrapped one of the larger brads from the Antique Brad set around where the knot is. I think it makes for a super cute accent don't you? =)


And now for the inside of the card - the message I stamped inside is a non-Stampin Up product. I used the same gingerbread man from the Got Treats stamp set and colored it with my Cherry Cobbler marker. I think stamping the inside of the card really helps provide the perfect finish to any handmade greeting card!


To order your supplies, please email me or visit my online store today!

Friday, October 21, 2011

Quick & Easy Card with Simply Sent Card Kit

During the month of October, Stampin Up is having a great promotion with its Simple Sent Card Kits - Buy Two Simply Sent Card Kits, and get a coordinating stamp set for FREE!!!  I couldn't pass up a deal like this so I bought a couple for myself. =) I bought the Everday Elegance Card Kit, and also raided Stampin Up's clearance rack since they had some really cure rub-on images on sale. I put the two together with a few extra embellishments and this is what I came up with - A quick and easy...yet super cute...Christmas card!!!


Stamps: Teeny Tiny Wishes
Paper: Everyday Elegance Simply Sent Card Kit; Cherry Cobbler CS; Confetti White CS
Ink: Cherry Cobbler
Accessories: Candy Cane Rub-Ons; 1-3/4" circle punch; 2-3/8" scallop circle punch; Word Window Punch; Modern Label punch; Rhinestones


Order your Simply Sent Card Kits today! Visit my online store to order your supplies, and don't forget to check out the clearance rack!!!

Wednesday, October 12, 2011

First Christmas Card of the Season

A couple of weekends ago, I was in the mood to listen to some Christmas music. I plugged my iPod into the docking station with speakers, loaded my Christmas playlist (I was listening to Celtic Thunder Christmas Special), and let the good times roll! Here is my first Christmas Card for the upcoming holiday season!!!  


Stamps: Forest Festivities (2011-2012 Holiday Mini)
Paper: Wild Wasabi CS; Melon Mambo (Brights Collection) stack pack; non-SU holiday DSP


I also created coordinating envelopes by stamping my white envelopes with the tree image from Stampin Up's Punch Pals (#116588)  woodmount stamp set. I colored the stamped images on the envelopes with my Pear Pizzaz and Daffodil Delight markers.


For the inside of the card, I used a piece of vanilla cardstock and added a strip of the same patterned paper I used for the front of the card. This is a great way to make good use of your DSP scraps!

I am creating some chrismas card sets which I will post for sale on my blog. Each set will contain 4 to 6 cards, with coordinating envelopes, and will range in price from $14.00 to $20.00 a set. Please feel free to contact me with any question.


Visit my online store to order your supplies today!
Happy Stampin!!!
Related Posts Plugin for WordPress, Blogger...