Promotions & Upcoming Events

June 1, 2012
Release of new annual catalog
Showing posts with label projects. Show all posts

Sunday, July 22, 2012

Sweet & Simple Sunday - Pinwheels


I may be "behind the times" with the latest and greatest in stamping, but I feel like Pinwheels are the the newest trend these days. I wanted to experiment with some retired DSP I have and used one of the new SU background stamps to add some quick and easy texture and embellishment.


Card Recipe
Paper: Confetti Cream CS; Early Espresso CS; Blueberry Crisp DSP;
Stamps: Netting background stamp; Bring on the cake Stamp set
Ink: Early Espresso; Not Quite Navy
Accessories/Tools: Night of Navy 1/4" grossgrain ribbon (retired); Antique brads; 3/16" neutrals brads; Designer Label Punch


Click here to visit my online store!


Sunday, July 15, 2012

Sweet & Simple - New Uses for Old Things


I have been saving these small 8 ounce jars looking a use for them. Well, this weekend I realized I could easily decorate them and use them to hold my makeup brushes. These jars are way cuter than the red SOLO cups I was using before!


For this jar, I used the Twitterpated DSP from this year's Sale-A-Bration period, and the Pocketful of Posies DSP from the 2011-2012 annual catalog. Other supplies included Beautiful Butterflies Bigz Die, Chantilly Lace Ribbon, Large Oval Punch, and Pearls


For this second jar, I first ran a piece of Pool Party cardstock through the Big Shot using an embossing folder with a vintage design. Then I sponged over the cardstock with Soft Suede classic ink.  Again, I used a piece of Twitterpated DSP in Peach Parfait. Other supplies include Notable Alphabet stamp set (new to the 2012-2013 annual catalog), En Francois background stamp, Whisper White cardstock, Curly Label punch, Early Espresso baker's twine


For this last jar, I used Elegant Soiree DSP (retired), Confetti Cream CS, Basic Gray CS, Teeny Tiny Wishes Stamp set, Serene Silhouettes stamp set (new to 2012-2013 annual catalog), Big Shot, Bitty Banner Framelits (new to 2012-2013 annual catalog)


Click here to visit my online store today!
Happy Stamping!


Sunday, June 10, 2012

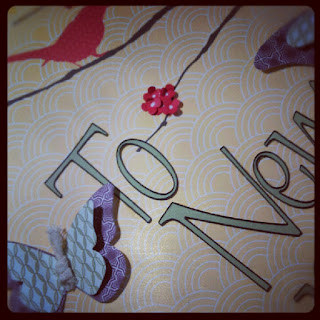
To New Beginnings....

A good of friend of mine who runs her own business as a esthetician recently relocated her business.  To congratulate her on the growth of her business and the new location, I wanted to make something for her to celebrate this  new beginning....


I created this 12x12 sign with the help of my Big Shot and Stampin Up dies and materials, and my Cricut, which I really should use a bit more. I started with Stampin Up's Pocketful of Posies DSP (retired - from 2011-2012 catalog), and moved forward from there. 


The larger butterflies were cut with the Big Shot and SU's Beautiful Butterflies Die and more Pocketful of Posies DSP. For the bodies of the butterflies, I used SU's Chantilly Lace ribbon.


The letters were created using my Cricut machine and Cricut Lyrical Letters cartridge.  Cricut has these awesome markers that you can use with the machine to first draw the image before you cut it so that the image has a nice outline. Essentially, you remove cutting blade and insert the marker in its place, select your image and have the Cricut draw. Then remove the marker and put the cutting blade back, re-select the image and let the machine cut it out. Here, I used SU's Pear Pizazz (retired, 2010-2012 In Color) for the letters.


My friend really liked this little gift I made her, and she already put it up in her shop! For anyone in the San Diego area looking for a great place for a facial, wax, or needing make up services for a special event, check out Just Skin! Lorraine did my makeup for my wedding 2 years ago, and I have been seeing her ever since. =)

Here is the link to Just Skin's facebook page and website =)
Hope you like today's project. Click here to visit my online store and order your supplies today!

Wednesday, May 30, 2012

gift baskets to welcome baby

Several weeks ago, I was asked to put together some baby gift baskets for co-workers. My fellow co-workers supplies all the lovely gifts and trinkets to go inside of the basket, and all I had to do was put it all together in a cute package. Here are photos of what I came up with:


For the yellow basket on the let, I used Stampin Up Simple Letters Alphabet, some retired DSP from the SU Clearance Rack, and my Big Shot to cut out the phrase "oh baby." With a little hot glue, I adhered it to the side of the bucket. I was able to get a large gift basket "bag" from Michaels and tied the top with SU's 1 1/4" stripped ribbon in Daffodil Delight (retired).

For the pink basket on the right, I pulled out my Cricut! With the Stretch the Imagination cartridge, I cut out the baby image. The letters were cut using my Winnie the Pooh Cricut cartridge. And with my handy dandy hot gun, I was able to adhere everything to the basket with ease! Then I wrapped everything up with a some shrink wrap.  I really liked how the front turned out, so here is a close up photo =)


I used some SU cardstock and embellishments for this one as well. The baby image was cut using SU retired Blush Blossom, Cameo Corral (retired), and Basic Gray cardstock. I used my SU Blush Blossom marker to color in the baby's cheeks, and SU's 1/8" Very Vanilla Taffeta ribbon and everyday enchantment brads for some embellishment. For the letters, I used SU's Basic Gray cardstock and some miscellaneous cardstock I had stashed away.

Have a great week everyone!!!


Sunday, March 25, 2012

Sweet & Simple Sunday - Party Projects

This past weekend was pretty jam packed with baby showers and birthday parties, so instead of the usual Sweet & Simple Sunday card project, I wanted to showcase some of the items used to decorate and liven up my girlfriend's baby shower. I helped out by creating the party favors and cupcake toppers. The first photo below is a picture of the dessert table my god sister put together for her sister's baby shower.


Isn't her set up just the best?! She bought these oh so delicious cupcakes, created mini smores desserts in mini shot glasses, chocolate cookies shaped in mustaches, and brought in beautiful flowers to accent the table! Everything looked great!


I created the mini milk carton party favors using Stampin Up's Mini Milk Carton die and my Big Shot. I alternated between So Saffron, Wild Wasabi, and Marina Mist card stock for the cartons, then decorated them with Just Add Cake DSP. For added embellishment, I used the My Digital Software, Little Additions digital brush set, and Many Mustaches digital brush set to print out the images to stick on the front of the cartons. Finally, I used Stampin Up's mini clothespins to hold one end of the mini milk cartons together.


I also used MDS to create the mustache cupcake toppers. After printing it on Marina Mist CS, I punched the images out with my 1 1/4" circle punch, and layered it on a piece of Just Add Cake DSP punched with my scallop square punch. I then used my hot glue gun to adhere the toothpick to the back.


In addition to the dessert table, my aunt labored in the kitchen and satisfied our appetites with homemade mac n' cheese, grilled cheese sandwiches, sliders, french fries, and some other awesome goodies!


Saturday, March 3, 2012

Beautiful Butterflies Die

Here is a card I am really excited about sharing! I had a sketch envisioned in my head the last few days centering around SU's Beautiful Butterflies die. I was finally able to execute it, and I am rather proud of the finished product =)

Card Recipe
Paper: Peach Parfait CS; Whisper White CS; Soft Suede CS; Pool Party CS; Everday Enchantment DSP (2012 Sale-a-bration)
Stamps: En Francais Background stamp; Something to Celebrate (for inside sentiment)
Ink: Soft Suede
Tools: Big Shot, Perfect Pennants Die; Beautiful Butterflies Die; 1 3/4" circle punch
Accessories: Basic Pearls; 1/8" calypso corral organza ribbon (2012 Sale-a-bration)


Don't you just love the little ribbon tails I added to the butterfly! I used the Calypso Corral 1/8" organza ribbon from the 2012 Sale-A-Bration catalog. Even though I liked the way the buttlerfly looked, I thought it was looking a little plain once I placed it on the card front. I think the ribbon gives it a more whimsical feel! It just goes to show you that ribbon is good for much more than tieing bows!


Since I did not put a sentiment on the front of the card, I decided to stamp it on the inside instead. I used the "Happy Mother's Day" sentiment from the Something to Celebrate stamp set (from the 2011 Occasions Mini catalog). The inside is also decorated with a strip of Everyday Enchantment DSP, as well as with a brad from the Everyday Enchantment pack seen in the 2012 Occasions Mini.

I hope all like this card as much as I do!

~Happy Stamping~

Monday, February 13, 2012

Top Note Valentine's Day Treat Holder

Valentine's Day is just around the corner! Check out this cute little Valentine's Day treat holder created using Stampin Up's Top Note Die.


Project Recipe:
Paper: Real Red CS; Real Red DSP - Brights Paper Pack; Whisper White CS
Stamps: Teeny Tiny Wishes
Ink: Real Red
Tools: Big Shot; Top Note Die; Full Heart Punch, Word Window Punch
Accessories: 5/8" Whisper White Organza Ribbon


After running my real red CS through the Big Shot with my Top Note Die, I scored the top note at 1 7/8" on both sides using my scoring tool. Simply fold along the scored lines you just created, and adhere you cany inside with SNAIL adhesive. Wrap it with your ribbon, embellish, and...ta-da!
All done!

~Happy Valentine's Day everyone~


Monday, February 6, 2012

Hostess gift - Post it note holder


As a gift to a customer who recently hosted a workshop with me, I made a little post it note holder for her perfect for holding a 3x3 size post-it pad.  I found the instructions on how to make this post it holder on Laurie Zoellmer's blog

Instructions:
Start with a 3 3/4 x 7 1/2" piece of card stock. Score at 3 5/8" x 3 7/8".  Fold at the score lines and attach 3x3 post it pad to the inside. Embellish front of holder as desired.


Project Recipe
Paper: Soft Suede CS; Peach Parfait CS; Everyday Enchantment DSP
Stamps: You're My Type
Ink: Soft Suede; Peach Parfait
Accessories: Silver Brads


Saturday, January 14, 2012

Taking Advantage of a Good Sale

Michaels is having a really good sale on picture frames this week....most of them are buy one, get one free. So I just had to take advantage of it and stock up on a bunch of different picture frames. I didn't really go to Michaels with any specific project in mind, but I knew that once I got home with the different frames I would come up with something...and I did! We have this one 8x10 print from our wedding I had tucked away because I hadn't gotten around to displaying it yet. Well, check out what I created using one of the frames I picked up from Michaels this week!


I should have taken a picture of the frame before I dressed it up, but it was just a white frame that already had that tarnished look to it with a white photo mat insert. After I inserted the photo, it still looked to plain to me. So I removed the photo and decided it wouldn't hurt to embellish the photo mat a little bit. I really coudn't help myself!

I used the Baroque Border stampin wheel to create the border and stamped in Soft Suede ink. Then I sponged the edges with more Soft Suede ink to give it more of a vintage feel.  The word "LOVE" was created with Stampin Up chipboard letters sponged with Cherry Cobbler ink.


I used the Beautiful Butterflies Bigz Die to create the butterfly embellishment. I used Baja Breeze cardstock stamped with the Medallion stamp after cutting the bigger butterfly. Then cut a smaller butterfly out of Glimmer Paper. I added additional accent with basic pearls.


Check out this finished project in person at my open house on Jan. 21st.


Friday, January 13, 2012

My Welcome Banner


In preparation for my open house for the new year, I wanted to make a welcome banner to invite everyone in. I pulled out my Perfect Pennants Bigz Die, Simple Letters Alphabet, cardstock and DSP and just went at it!!! This banner did not take very long to make at all! The hardest part was deciding on a color scheme!


You can use any color scheme you want to recreate this banner. I decided to use some retired DSP and cardstock that I had on hand. I used Bermuda Bay CS (retired) for the pennants, and then ran the pennants through my Big Shot with the Perfect Polka Dots Embossing Folder. The scalloped circles were cut using Thoroughly Modern DSP (retired). For the letters, I used textured Soft Suede cardstock.

To string the pennants together, I punched small wholes in the corners and laced some twine through them all. Ta Da! All done!

Check out the finished product in person at my open house on Saturday Jan. 21, 2011

Wednesday, January 4, 2012

Stampin Up Matchbox Die

Party favors anyone? Here is a great party favor created using Stampin Up's Matchbox die (#114890).


As I was going through my stash of SU products, I relaized I had quite a bit of retired DSP. So to creat this matchboc, I decided it was about time I  stopped hoarding my supplies and actually do something with them. So this matchbox favor was created using a lot of retired products, but can be reproduced in an infinite number of ways with current SU products


For this matchbox, I used the Thoroughly Modern DSP (retired), Taken with Teal CS (retired), Soft Suede Polka Dot grossgrain ribbon (retired), and the Matchbox Messages stamp set (retired).


This is what the inner box for the matchbox looks lile after it is assembled. I punched a whole on one end and looped a piece of ribbon through to create a pull tab. I just stapled the loose ends of the ribbon together to "lock" it into place.


Then I put in some tissue paper and placed a Ghiradelli chocolate square inside as the treat. These choclate squares fit perfectly inside this matchbox.


The Matchbox die can be used to create favors for any type of event - wedding, birthday parties, you name it! Stay tuned to see other fun projects I create with this fabulous die. Don't forget, you're going to need the extended cutting pads when using this die. Th extended cutting pads are sold seperately (Big Shot machine comes with standard sized cutting pads and multpurpose platform).


NOW through January 5, 2012, additional products (including punches, dies, designer series paper, ribbon and more!) are being added to the Stampin' Up! Clearance Rack with some discounted up to 80 percent! These great deals are only available when you purchase on-line and while supplies last.

Sunday, January 1, 2012

My Wedding Photo Collage

My husband and I have been married for almost a year and a half now, and I finally got around to creating this photo collage. A little late...I know...but better late than never right? The opportunity presented itself more so when we received one of those picture frame collages for Christmas. =)
What a great way to create preserve memories while adding your own little creative twist!

This frame collage holds a total of 8 photos, but I only picked 6 pictures and embellished the remaining two spaces using my awesome Stampin Up supplies and other little tidbits I have been hoarding for the last few years. I think I may have even impressed my husband a little bit when I showed him the finished product! =) 
I created this "love" sign using a combination of Stampin Up (SU) and non-SU products.  I used a 4x6" piece of SU's Elegant Soiree DSP (retired) for the background. I also used the Beautiful Wings Embosslit, Cherry Blossom Embosslit (available in clearance rack), and the Little Leaves Embosslit. I added a wedding cake shaped brad (non-SU) to the center of the cherry blossom. I embellished the top left corner of the frame a flower cut from SU's Fun Flowers Bigz die.

For the second empty spot, I took a piece of Very Vanilla cardstock, created a background with SU's En Francais background stamp (using Crumb Cake ink), and the Elements of Style Stamp set (using Baja Breeze ink). Other supplies used include Whimsical Words stamp set (retired), Four Frames stamp set, Elegant Soiree DSP (retired), scallop oval punch, decorative label punch, and pearls.

I picture frame still looked a little plain to me, so I decided to add some tiny paper flowers here and there.

If you like this project and are interested in creating something similar, please feel free to contact me for ideas, tips, and supplies!  
Happy Stamping!


NOW through January 5, 2012, additional products (including punches, dies, designer series paper, ribbon and more!) are being added to the Stampin' Up! Clearance Rack with some discounted up to 80 percent! These great deals are only available when you purchase on-line and while supplies last.

Wednesday, November 23, 2011

Birdhouse Project


One of the great advantages of being a Stampin Up! demonstrator is having access to a wealth of inspirational resources that always get me motivated and excited to create. One of the fun things I came accross was this mini birdhouse pattern. It is super easy to create! I printed out the template on a sheet of bermuda bay cardstock (retired) and rose red cardstock, cut out the pieces, and assembled it with some SNAIL and TOMO Multi-purpose adhesive.


I used the flower punch from my Itty Bitty Punch set and my crop-o-dile to create the little flowers decorated the entrance hole. Additional supplies used included Thoroughly Modern DSP (retired), 1 1/4" circle punch, and square punch (to create dove tail on banner).

To create the stands for the birdhouses, I took two regular wood pencils and wrapped them with some  more Thoroughly Modern DSP. I punched a hole in the buttom of the birdhouses and inserted the pencils.

It took a little manipulating to get the birdhouses to set nicely, but i got it to work =) Then I took an empty yogurt container that I cleaned out...that's right...an empty yogurt container (i knew saving these empty containers would come in handy at some point) and wrapped it with some more DSP. Wrapping the container was a little bit harder than i thought it would be, but, again, i made it work somehow. The wrapping didn't look as "clean" as I would have liked, but it was presentable. To hide some of the seams and unwrapped parts of the container, I just used some melon mambo polka got grossgrain ribbon and chantilly lace ribbon.

I also needed a filler for the container so I could the birdhouses in there. A friend of mind has this wonderful of idea of just getting a bag of the rocks used for fish tanks since there are pretty inexpensive - so i did that..spent maybe 3 bucks! Then topped it off with some rocks the hubby and I collected when we took a trip to Cape Cod and Martha's Vineyard back in June.

Saturday, November 12, 2011

My Very Own Winter Wonderland


The holidays will soon be approaching, and what a better way to get into the holiday spirit than to start pulling out the the holiday decorations - on in my case....creating my own! With a little bit of imagination, I created these holiday trees to decorate my crafting space for the holiday season. I also used these trees as part of my display at the Life & Style event my friend organized tonight (more photos from the event to come).  I had a lot of compliments about these trees =) I made me very happy!


To create these beautiful holiday pieces, I used the following Stampin Up supplies: Big Shot, Fun Flowers Bigz Die, 2 3/8" scallop circle punch, 1 3/4" scallop circle punch, Perfect Polka Dots embossing folder, Snow Burst embossing folder, Beautiful Butterfly Bigz Die, Multipurpose Liquid Glue, Whisper White Cardstock, Silver Glimmer Paper.


Additional supplies: white styrofoam cones of varying sizes, hot glue gun, straight pins (I used flower pins with the pearl tips so I could just stick it through my finished flower and into the Styrofoam cone).


I accented my trees with butterflies cut from the Beautiful Butterflies Bigz Die.  They too we adhered to the Styrofoam cones with the pearl tipped straight pins.


I created a base for the largest of my three holiday trees. The base is actually an empty yogurt container that I washed out. Using SU's Holly Berry Bouquet Designer Fabric and my hot glue gun, I adhered the fabric around the empty container. To clean up the edges, I used 1 1/4 striped Grossgrain Ribbon in Cherry Cobbler that first folded in half and adhered together with my hot glue gun. The "Peace on Earth" sentiment is from the Four the Holidays stamp set.


Related Posts Plugin for WordPress, Blogger...